There always seems to be a reason why it's not possible to completely finish some particular part of this project and it's very frustrating. Jumping to a new area of work before finishing the current one means lots of loose ends, but that seems to be the nature of it, and whilst I try to plan ahead, it never seems to quite work out.
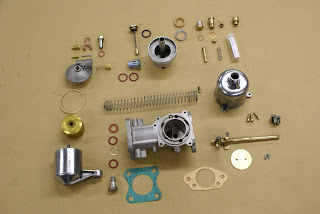
Whilst awaiting completion of machining of my Cylinder Head, rebuilding the carbs seemed to be an ideal fill in job. The spindles and main body which usually wear and allow air leaks are actually in very good condition, so its mainly a strip, clean and re-assemble exercise.
In a very senior moment whilst rebuilding my 140, I forgot that I had already bought a pair of HD6 service kits and ordered another pair (such lapses of memory do not bode well for the future I hear you say) so my only cost should be time. It all went rather well until I attempted to remove the fuel inlet union on the RH float chamber and a hairline crack appeared in the top. Burlen were out of stock, so that's another 99% completed job.
 |
| Doing one carb at a time means you can always look at the other when you forget how it all goes back together. |
 |
| All done. Just need a new top for one float chamber. |
The £250 boot lid wood frame arrived on time and as requested was supplied disassembled. I would have to say, the quality of workmanship is quite exceptional. It all went together perfectly and I attached the various metal parts in order to do a trial fit. The overall size and shape looks about right and I am just awaiting the bodywork guys to fit the locking bar keeps to the body and tweak the fit.
I then need to dismantle it, paint all the steel parts with red oxide, and rebuild it inside the aluminium skin. More on this in a future post.
Clutch shaft and fork assembly
The taper pin which engages the clutch fork on its operating shaft was still doing its job but came out in three pieces, I would think the inevitable consequence of fitting a tapered pin into a parallel hole. The replacement item was over size but has a parallel shank so I needed to first clean up the hole in the shaft, then have the pin turned down to make it an interference fit.
The shaft bushes were also quite worn as was the carbon thrust plate on the fork, so both were replaced, the latter with a Coventry Auto Components upgraded item.
 |
| Old taper pin came out in three pieces. New one is parallel |
 |
| Clutch shaft bushes - easy to slip in a ten thou gauge |
 |
| New thrust, pins and bushes. Bolt wiring technique is improving. |
With all these minor jobs completed, its time to fit the flywheel, clutch plate and cover, but first I need to ensure that the clutch plate is centrally aligned against the flywheel. A half inch brass drift makes the ideal base for the alignment tool. Add an old socket and some insulation tape to make up the clutch plate spline ID - perfect.
 |
| Heath Robinson clutch alignment tool Each wrap of PVC tape increases the OD by around 4 thou so with care, it's possible to make this a very precise device |
 |
| Clutch plate and cover is now a 9.5 inch E Type spec item with flywheel drilled and tapped to suit |
When I restored my 140 fixed head, I fitted a Tremec T5 gearbox. Its a superb box with a great shift action so it was an obvious choice for the 120, especially as overdrive is not an option. It was supplied with a conversion plate to mate it to the XK bell housing - all quite straight forward.
 |
| Scary moment. will these much modified parts really fit together? |
 |
| Yes - with the usual bit of "waggling" its goes together nicely |
The downside of fitting the Tremec box to a 120 is that I will need to remove some steel from the main chassis cross member and fabricate some form of rear mounting bracket. I will cover this in detail in my next post.
Next Post - Mid June
