Saturday 31 December 2011

POST 21 - JANUARY 2012 - BARE METAL RESPRAY - REALLY!

New to Blogs?
If you're reading this for the first time, you might want to start at the beginning.  You can use the "Blog Archive" list to the right to quickly navigate around.  To find the start, click on 2010 (1) to go to the First Post.  Use the "Blog Archive" list again (2012) to return to here or anywhere in between.  Sorry if this is a little confusing but its just the way that blogs apparently work.  The last post is always the first post you see.

With just over one year elapsed since purchase, the work schedule is still reasonably in tact but will need to be improved on, to win back some of the built in contingency.  The Christmas break has seen nothing more than a bit of a "dabble" with the odd inevitable hangover not exactly helping things. 

For Christmas, my daughter bought me an Idiots Guide to Blogging which says that I should be producing between one and three posts a day to be successful. So hey-ho, I guess Ill just have to settle for failure with two a month.  If progress picks up, I could possibly stretch it to one a week!

Anyway, back to the job in hand.  How often have you seen the phrase in Classic Car adverts "bare metal respray" and wondered just exactly how bare was the metal at its very "barest" stage?   Back in August, the front and rear body sections and other assorted bits were taken to Dave Ferguson at Hutton Rudby and media blasted in every nook and cranny, with not a vestige of anything other than clean metal and lead remaining.  After this somewhat brutal process, the body was immediately etch primed to prevent the formation of any surface rust on the now spotlessly clean steel.  Dave had purposely picked an ideal hot dry day to complete the job, and then trailered the bits five miles back to Auto Body Craft at Stokesley.

The wooden temporary chassis had done sterling service up to this point, but in order to ensure an absolutely precise re-construction of front section, doors then rear section, it was decided that the chassis proper, currently also in etch primer, should be utilised from this point forward. 


Picture taken just before the trip to Dave's for media blasting, and
a reminder of the reason for removing the side of the wing.  Its the
 only way to gain full access to the nasty bits which invariably rust,
and reside behind it.  Although only the bottom of the side frame
 was rusted out, we decide it would be altogether better to replace
 the whole frame on each side.


After blasting and etch priming, with the new side frame from
Contour Autocraft in place and now sitting on the proper chassis.


New sill with B post, tacked in place for first trial fit, with the original
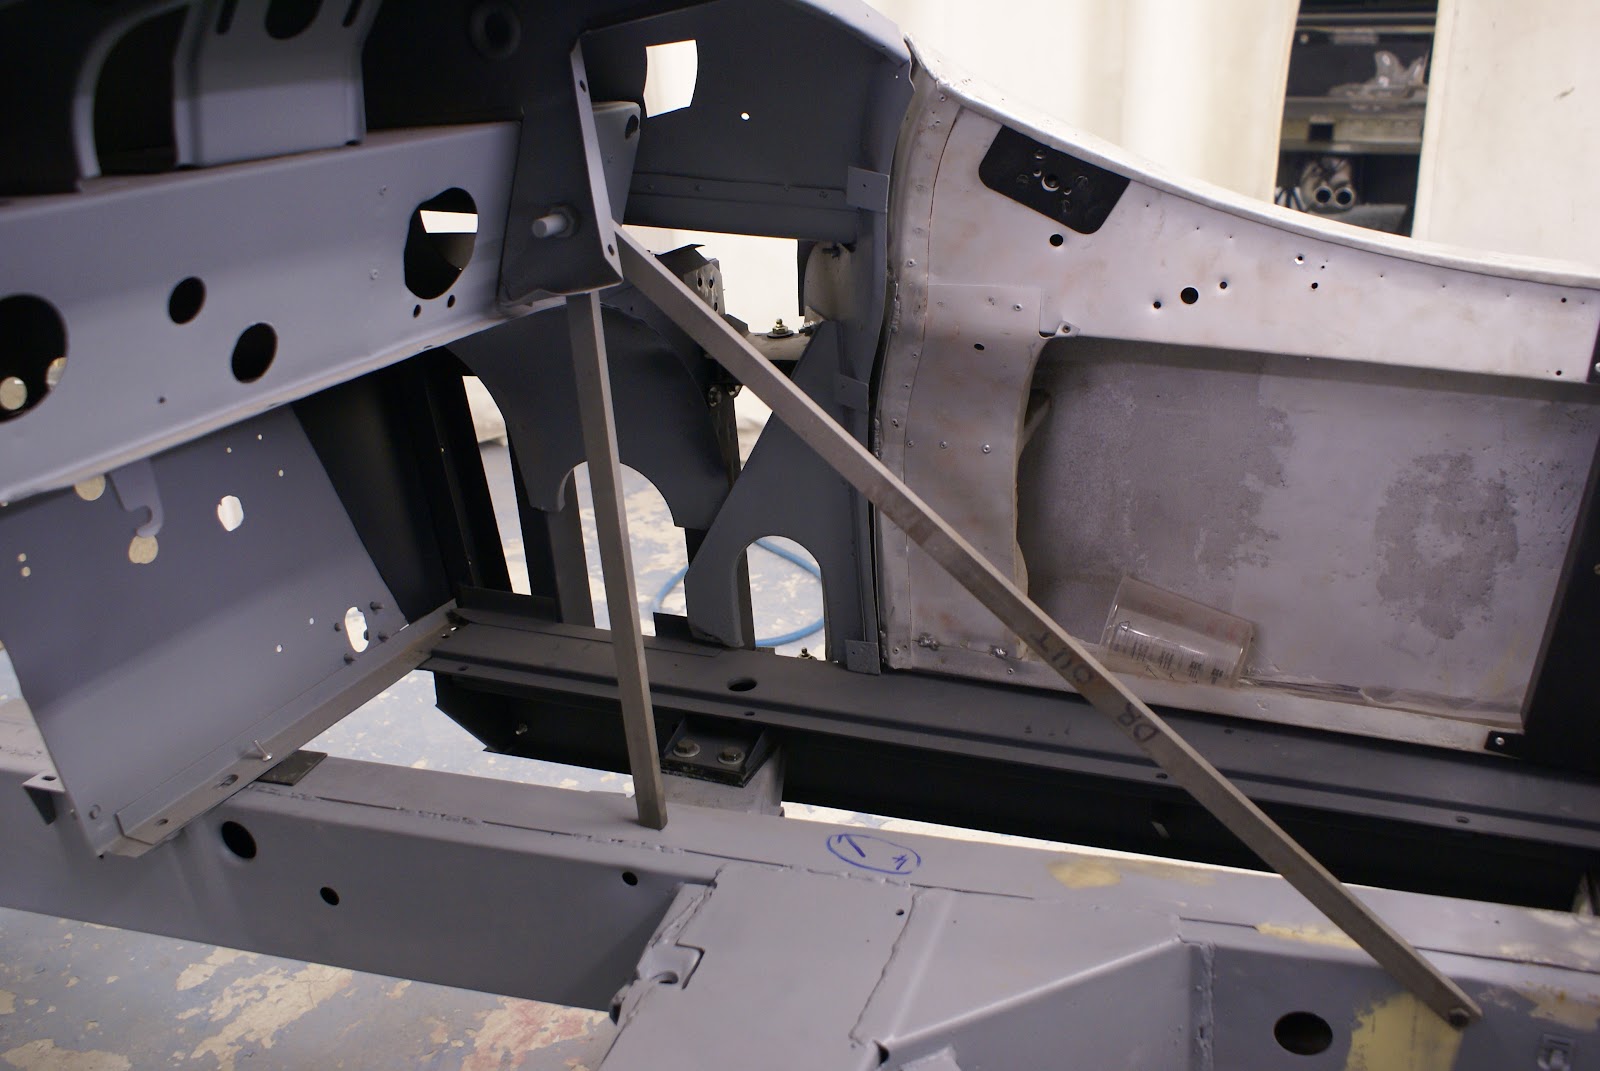
number of packing pieces on the chassis outriggers.  The steel
triangulated braces also fit exactly as before which all bodes well.

Lots of other detail bits are being attended to.  Alex just didn't like
the look of these flange plates, or the way they were fitted so
decided to replace them. 

Wing back in place after much seam sealing and wax-oiling of
the bits behind it.  The decision on the colour (previous post)
was essential because the door hinges needed painting and
fitting before the wing was welded back in place.  Door fit looks
pretty good and rear section first trial fit also looks promising.
Once Alex is happy with the way the whole car sits together on the chassis, it will have all the new parts properly welded back together.  A slight change of plan is to solidly brace the body with steel box section and adjustable threaded rod, so that it can be safely lifted off the chassis in one piece.  I then need to fabricate the rear part of the chassis in ply, to form a complete temporary base for Alex to sit the whole body on in order to start the bodywork in detail. This will free up the chassis for me to start re-assembly back in my workshop, hopefully around mid March. 

FROG EYE FRIGHT AND WHEEL WOBBLE
Back in 1996 a bought a Frog Eye Sprite (Bug Eye in Americana's)  I spent three years restoring it and another three making it go like stink, handle even better, and eventually stop.  This involved various hair brained DIY add-ons including Turbo Charging, Nitrous-Oxide and eventually after a few engine mishaps and detonations, a Supercharger.  I still have it, and use it for sunny days, the occasional hill climb and track days.  I usually drive it like a demented teenage delinquent and it scares the crap out of me.  It will I think, one day be responsible for the onset of an adrenalin related coronary incident.  Just a matter of time.

Somewhat crowded engine bay of Frog-Eye with ad-hoc additions
and associated plumbing, bit like a V12 Jag engine bay in that respect.
Through out my ownership it has always suffered to some extent from wheel balance problems and try as I may, I have never found a tyre depot that filled me with confidence, with endless attempts to get the wheels balance correctly.  I am pretty well barred from all my local depots due to my insistence that they do a second check after achieving the usual 0-0 on the balancing machine first time round.  Always, and I mean ALWAYS it no longer reads 0-0 when they very reluctantly put the wheel back on the machine.  The reason I'm sure, is that the cones are not designed specifically for wire wheels and the wheels fit on the machine slightly differently each time.  That's why, when you take them to the tyre depot you always hear the guy say "don't know who balanced these mate but they're a ******* mile out"  Actually, it was you, last week, and you charged me twenty quid, is a not much appreciated response.

So whats to be done?  Browsing EBay a few weeks back after yet another wobble issue, I happed upon a proper adaptor for balancing wire wheels, bid on it and amazingly won it for £26.00.  Its designed to fit a "Sice" balancer, so all I have to do now is find a Tyre Depot out of the area that has such a machine.


Adaptor for Sice wheel balancing machine  - after a little TLC.
The very fact that such an accessory exists must mean that
there is a need for it!
Next job starting 2nd week in January will be re-assembly of rear axle and one half of front suspension.

Wednesday 21 December 2011

POST 20 - DECEMBER 2011 - ELECTRICAL CHANGES & ADDITIONS

With my proper job occupying a good deal of time at present, not a lot has happened in my workshop, but quite a lot elsewhere.  The body is starting to take shape at Auto-Bodycraft with endless trial fittings of various bits, until they are happy that it will all go back together properly, before starting work in detail.
The block and head are at AMAC Northallerton awaiting the arrival of pistons, valve guides and a rear oil seal conversion from Classic Jaguar Texas, due any day now.
The rear axle is being re-assembled at Gearbox and Diff specialist Lagonda Garage Billingham with all new bearings, having had the axle casing soda blasted and re-painted.  Lots of assorted brackets plates and suspension parts are being powder coated at Romax in Stockton and a big box of fasteners have been cleaned and zinc plated at Cleveland Chroming. 
I have however, managed to find time for a trip to Coventry to collect my bonnet from Leaping Cats who have pressed in 48 louvres.  At the same time I called in to see Stuart at Coventry Auto Components who did me cracking deal on a front disc brake conversion, T5 Gear Box conversion and a couple of hundred other assorted bits and pieces. 

In addition to the front disc brakes and five speed gearbox, its time to start thinking about other alterations and additions.  Driving a fairly broad selection of old cars over the past 45 years has given me a reasonable insight into whats generally lacking in terms of comfort, reliability, usability and safety.  Being an inveterate tinkerer, I've added all manner of gadgets and upgrades to past cars, some awful and pointless (at seventeen, a set of Colonel Bogey Horns were the ultimate accessory) but equally, some, really worthwhile.  I am aware that at 63 I ought to be subscribing to the "original is best" school of thought and enjoying the contrast with modern cars - baulking gears and misting windows, but if I can improve on things without it being too obvious then I will. 

Performance and handling mods are generally well known in the XK fraternity and are often a question of what can be afforded, from super spec motors to all manner of handling and transmission upgrades.  What is more interesting I think are the little things that can be easily added at relatively small cost.  They can enhance daily usage but also make long distance trips much less wearing and consequently safer.  Many involve alterations and additions to the electrical systems and can be Incorporated into the existing (in my case new) loom or added and powered by an auxiliary loom, all totally concealed.

A good example of such an addition is the Mazda (yes - Mazda!!!) MX5 Heater blower installed under the nearside wing of my XK140 FHC where one of two six volt batteries previously lived.  This feeds huge volumes of air into a modern heater matrix (Mazda again), with the original XK heater front cover concealing the dastardly deed.  Total cost didn't exceed £85.00 with the bits coming from EBay and RS components.  It took three attempts and countless hours of enjoyable fiddling to get it right, with the big pay off coming from almost instant window de-misting and if required, more heat than even I can handle.


Mazda MX5 modified blower unit ensconced under wing.  Will
disappear from view entirely once the inner wing panel is fitted.

Original XK Heater front cover re-finished in crackle black with
small panel where control paddles exit to direct air flow.
 My wish list of electrical alterations and additions seems endless, even excessive, but almost all exist in some form on my 140 Fixed Head already.  Unusually, some were genuine period accessories fitted when I bought the car, with the rest added during my 3 year "rolling" restoration. 

1950's style accessories in 140 as bought - all quite ergonomic
but not very pretty.  Extra gauge is oil temperature.
After restoration.  Only additional gauge now is voltmeter.
Face changed by me to match other gauges.


Even more accessories and knobs - as bought.  One very handy item
is the rear screen demister in the form of a long heating element at the
bottom of the rear window.  Takes a while to work, but very effective.


Again, after restoration and back to factory original including
steering wheel.  Radio Head unit sits behind dummy draw front.
Centre arm rest now contains some badly needed lockable
storage space, plus an IPOD connection, USB 5Volt charger
and switch to disconnect fuel pump.  Also essentials for JDC
steak & kidney pie monthly meetings - indigestion tablets.
First owner of my 140 was Sir Robert McAlpine but it was mainly driven by his brother Kenneth who was a works driver and financial backer of the Connaught Racing Team from 1949 to 1957.  In the history file is a letter from Kenneth to a previous owner warning of brake fade "if one needs to stop quickly from 100MPH"!
The old wiring for all of the additions shown in the pictures of the car "as bought" was contained in a properly made PVC covered loom and I would say it was mostly installed at the same time and most likely by Coombes, who supplied the car new.

So, whats on the 120's electrical alterations and additions wish list.  To start with, the usual major items: Conversion to Negative earth, an alternator or possibly a "dynonator" - apparently an alternator which looks like a dynamo, high torque starter motor, Facet fuel pump, electric fan and electronic ignition (123).

A single 12 Volt Battery re-located under the off side wing, with cut off switch and charge socket (for winter storage).

Lighting upgrades to include halogen head light bulbs with relays to switch a heavy feed cable direct from the battery.  To avoid lots of arm twirling I suppose indicators are essential but will need a loud bleeper to ensure they are not inadvertently left on.  A super bright LED brake light incorporated into the reversing light might be sensible if the rear indicators are somehow incorporated into the tail lights.  It would be good to somehow fit front indicators into the existing side lights - possibly very bright orange LED's - needs some research.  A map reading light under the dash also sounds handy.

To slow down any opportunist car thieves and reduce my insurance premium, a high tech Immobiliser will disable the fuel pump and ignition. 

I'm not really sure about Radio's in open cars. The cacophony of wind noise and exhaust note usually negate the requirement.  But just in case, it may be sensible to include basic wiring for a radio head unit with IPOD connection, audio Amp / 4 speakers and an aerial possibly located in the windscreen surround rubber.

The one additional gauge which I would find very useful is a voltmeter, to monitor Alternator / Battery performance. Question is, where would it live?

Minor but essential details would include an ancillary equipment fuse panel, relay switched ignition feed, starter solenoid and ammeter wiring re-configured, a modern horn relay located in the original housing, manual switch disconnect for the choke (starting Carburettor) and a windscreen washer pump. It would also be good to have the dash and ancillary switch panel on modern connectors for easy service / removal.

The correlation between classic car breakdowns and flat mobile phones is well known, so a 5Volt stabilised USB socket in the arm rest storage box, is I think, the most likely and obvious way to avoid them.
Likewise, a 12V socket behind the seats to provide power for a cool box full of beer will make the wait for the breakdown truck that much more enjoyable, especially as you won't be driving anywhere for a while.

One other upgrade I would like to play with is a Davies Craig electric water pump with Electronic Control Unit.  It seems to me to be such an obvious solution to absolutely control and optimise all aspects of engine temperature.  Conversely, it may be a total waste of time and money, but it does sound interesting.  I will cover the installation in some detail when I get around to it - I would estimate July / August 2012, and eventually report on the effectiveness - or not.

I will hopefully have some real progress to write about at the beginning of January 2012 having had a few days to "get properly stuck in" over the Christmas break.

Just been to collect my suspension bits from the powder coating company to assemble over the hols - Sign on the door says - Closed until Jan 3rd !!!

Sunday 4 December 2011

POST 19 - DECEMBER 2011 - MAJOR DECISION TIME

Choice of colour has been an ongoing consideration since starting this project in earnest in spring.  Although many months away from painting the car, I need to make the decision now so that the door hinges can be painted prior to the wing sides being re-fitted.    Main contenders being British Racing Green, (BRG) Metallic Silver and White.  Each has its plus and minus points:

British Racing Green
Definitely my favourite classic car colour.  After a nut and bolt 3 year restoration of a Healey 3000 around six years back, I thought it looked fabulous in BRG but strangely, I didn't really enjoy driving it.  After all that work this was a bit of a disappointment.  Very subjective, I know, but I can only deduce that Big Healey devotees have never tried XK's!
Ralph Lauren had a early works aluminium 120 OTS in BRG in his L'arte De L'automobile exhibition in Paris this summer http://ralphlaurencarcollection.co.uk/  and it easily held its own in the style stakes in the company of multi-million pound Bugattis, Ferraris and Alphas.

My gorgeous looking but disappointing to drive Healey 3000
BRG scores a big minus however, because apart from it not being the cars original colour, it was not available until March 1952 so effectively a non original colour for any 1950 XK120. 
Also, I already have an XK in BRG all be it a rather unusual shade and referred to by our local Jaguar Drivers Club Chief, Mr Geoff Mansfield as DMO (Drab Military Olive)  However, this BRG/DMO 140 FHC, unlike the Healey 3000 makes up for any cosmetic shortfall with its superb performance, handling and amazing high speed - easy 90MPH - cruising ability (considering its 1955 build date)

The ultimate classic touring car.  In BRG or DMO.  I doesn't
really matter.  If you want to get places quickly, in relative
comfort and subtle style , this is THE car to do it in.  
Final nail in the coffin for BRG however came from wife Angela who simply proclaimed one old green banger is already one too many!   Many years ago, I was confident that I'd won her over on our first (blind) date, after arriving at the pub in my newly restored (BRG would you believe) flat rad Morgan, looking like a total prat, replete with flying helmet and goggles. Could it be that she has never forgiven me after the oil pressure gauge quietly dripped black oil onto her new white pleated mini skirt.  At the time, I saw the oil stain as an appropriate initiation into my old car world, but I am starting to wonder if after 37 years, this was a youthful misjudgement.

Metallic Silver.
It took a while to convince Alex, from Auto-Bodycraft that metallic paint even existed in 1949. Obscure plus point but curiously satisfying.  It was a factory option standard colour from the launch of the 120 but was discontinued in November 1952.  I wonder why - lack of orders, difficult to get right perhaps?

Silver 120 takes on a strange hue under the lights of the NEC
Body may actually be sterling silver at this price!
It seems there are literally hundreds of versions / hues / tints / shades of metallic silver.  It doesn't help the case for silver that it apparently accounted for 26% of all cars produced in 2010

White / Old English White / Cream
The Heritage certificate lists my car as cream, but the old brown log book says white.  The first owner, Vernon Maitland (See Post 12) in an email to me says the Heritage certificate is incorrect, and states very positively "My car was not cream, it was white"
According to some knowledgeable sources these are simply name variations for one and the same colour but they do look different to me from period pictures.  This could of course be down to photographic processing or  fading of white / cream to another shade or even variations in factory paint.  I guess after 60 plus years  its difficult to be sure.  What is certain is that it would be good to retain the original colour.  This is further enforced when respected XK expert Ian Mills of Twyford Moors tells me that White (Cream) with red upholstery is the the top spec when it comes to selling 120 OTS's.  - Executor take note!

Then I come across this picture. Decision made.

I don't know why this is so intrinsically right, but it absolutely is!
And this is exactly what I hope to achieve.
Image from XK Data 
http://www.xkdata.com/
Post script.  I have since discovered that this is the car once owned by Daily Express cartoonist Giles.