Thursday 16 May 2013

POST 55 - MAY 2013 INDICATOR SOLUTION & NUMBER PLATES

Front Sidelights / Indicators
Whilst the front sidelight / indicator combination worked in principle, it did need to be tidied up.  First off I found some BA9 lamp holders and then some very high power 1W amber BA9 base, LED's on ebay from  http://stores.ebay.co.uk/Wholesale-Xenon-Lights-Store in the USA at about £3.00 each. A short length of 1.125 inch hexagonal bar (again from ebay) had a pair of 1/4 inch slices cut off it.

Basic components for one side.  Note tiny PhotoMOS Relay

Three 10mm holes are then drilled to accommodate the lamp holders.  These are a nice interference fit and a little superglue dribbled around the sides permanently fixes them in place.

Hex bar drilled to accept 10mm OD BA9 lamp holders

Because the sidelight Cree type LED is so immensely bright, the indicator amber LEDs are nowhere near as crisp and distinct as when the side lights are off .  This is especially noticeable when viewed head on due to the narrow angles of illumination. So whats required is for the sidelight to temporarily extinguish exactly as the indicator comes on, a job for a normally closed relay.  Because the LED's draw such a small current (20mA) we can go one better and use a solid sate Photo-MOS type relay, small, very fast switching and hugely reliable. 


For those unfamiliar with the operation of such things, here's how it works :
With the sidelights on, the 12V supply is connected to pin 4 and as the relay is normally closed, the supply continues to pin 3, illuminating the white sidelight LED.  When 12 volts appears from the flasher unit, as well as going to, and illuminating the two amber LED's, it also goes through the 470 Ohm resistor to pin 1.  This triggers the relay to change state to open circuit between pins 3 and 4 turning the sidelight off.  If you want the sidelight to temporarily dim, then connecting a 1KOhm resistor across pins 3 and 4 will allow limited current flow.

Again, note tiny relay with pin 2 soldered onto common earth

Heat shrink tidies it all up and prevents accidents

If your 120 has the later sidelight arrangement where its not a separate item, I believe the aperture for the front lens is considerably wider at around 1 and 5/8 inches (the chrome item above is less than 1 inch) so the assembly should just fit nicely straight through the front, once the original lamp holder is removed.

I would have to say that the finished product worked superbly.  The change to brilliant orange is so fast that your not aware the the sidelight has been extinguished and there is no way that anyone could mistake your intentions.  Fitting the 1K resistor would technically leave the side light on but I think its better without it.

Sidelight around three times brighter than original filament lamp
Photo makes indicator look yellow when its actually very bright orange / amber
The final part of the indicator upgrade is the fitting of a cheap but loud 90dB Piezo sounder.  With non self cancelling indicators this is a pretty essential item and guarantees that you'll never leave your indicators on by mistake.  Total cost for the front sidelight / indicator components - circa £40

Number Plates
The general consensus seems to be that the original number plates were most likely but not necessarily made by Ace.  Looking closely at the picture of my car when two weeks old, they do seem to look like Ace type cast aluminium numbers.  These are still available from Framptons and I opt to buy the individual numbers in order to make up my own plates, thus getting the plate dimensions exactly right.  This also saves me £80, but they are nevertheless expensive at £16.25 per number. 


Easy solution to get the pin holes in exactly the right place
The numbers are arranged on a sheet of cardboard, the pressed down to leave a mark where the fixing pins go.  The cardboard was then stuck to a sheet of 2mm aluminium and the marks centre-popped. 


Plate ready for powder coating satin black
The Aluminium plate was then drilled to accept the number pins and the reverse side countersunk. The plates were sent off for powder coating satin black.  Rather than use the cir-clips provided, I reduced the pin lengths to 2.0mm, pressed the numbers in, then epoxyed the pins into the countersunk holes.  This made the backs of the plates flush allowing them to be fastened flat to the number plate pressing.  I also sealed the plate to the pressing with a thin rubber strip to prevent water ingress between the two.

Numbers should possibly be little less shiny - time will sort

Front end almost finished


Miscellany
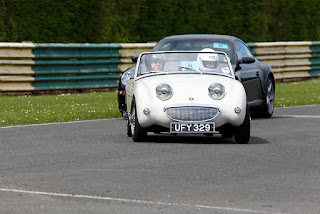
Two events since my last post.  The first being a track day at Croft racing circuit.  Feeling guilty about neglecting my frog-eye sprite, I spent some time giving it a general service and sort out and on the day it repaid me in spades having no trouble seeing off several TR's and even a modern MGF.  (See post 21 - January 2012 to find out how this could be).  Great weather for a change and a truly brilliant day which everyone enjoyed, even Nick who was black flagged on every session in his new Audi RS3.  Your 66 Nick, (or is it 67) and I really think its about time you started to take some responsibility for your actions.

Frog-eye punching well above it's weight

Porsche 911 - probably slip-streaming to gain an advantage
 Stratstones, the local Jag dealers made an appearance with a new F type during the lunchtime break and as we had a couple of C types, a D type and a few E types already present, it was a great photo opportunity.  The best shot I got was of them coming out of the hairpin onto the pit straight about 150 yards distant. Great composition but crap quality.

CDEF - Possibly a photographic first?

The second event turned out rather less memorable.
I volunteered to spend the day marshaling for the Jaguar Drivers Club annual rally last Saturday.  This event had previously been organised and run by the same man for quite a number of years and I suspect that for some regular entrants, this was the extent of their world as far as rallying goes.  For whatever reason, possibly because it was held in the North East, a new organiser was brought in.  His brief was to put together a navigation / regularity event based on MSA regulations and licences and that is precisely what he did.  Unfortunately, the gap between the expected event and previous experience of the competitors and the delivered event strictly in line with MSA regs was rather large.  The new organisers not unreasonably assumed that the competitors were all seasoned and consummate enthusiasts whereas at least half were simply out for a pleasant Saturday afternoon sociable drive through Wensleydale.  The best that can be said is that both organisers and competitors were equally unimpressed with each other.
The day was not helped by wind and rain spoiling the magnificent views on route.  Additionally, the lunch stop at a Wensleydale Hotel further wound up the already exasperated  assembly by charging a tenner a head for a mediocre bowl of soup and a Sandwich.  By the time we got in from the rain after arranging the parking of the 45 cars, the soup was barely warm and the sandwiches had all been eaten. Worst of all, I had left my carefully prepared Mrs E's finest home made soup and ham sandwiches behind after the promise of a good buffet lunch at said eatery. 


Thursday 2 May 2013

POST 54 - MAY 2013 - LED SIDE LIGHTS, INDICATORS & BRAKE LIGHTS

At the beginning of February I spent some time looking at incorporating LED indicators into the front and rear side lights. Realising I would be pressed for time to meet the agreed date to send the car to the trimmers, I put this on the back burner after finalising the design for the rear lights and making a prototype which seemed to work pretty well. -  (Post 48)
The available space within the front side light was very limited and a solution using individual LED's (based around the rear light design) proved unsatisfactory.  To resolve the space issue, I carefully removed the lamp holder from the lens assembly.  This effectively gave me an empty side light housing to play with.


So, time for a re-think.  Fortuitously, friend Nick dropped in to use the facilities to fettle an amateur radio aerial, and we got chatting about the indicator project.  Nick has an amazing knowledge of all things technical and electrical in particular.  Consequently, pre-wikipedia, "Nick-L-Know" was the standard response to most technical queries. 


Nick Peckett   AKA Peckett of Kabul

Nick has spent the final third of his working life developing the mobile phone network in Afghanistan, his company initially working for the Taliban, then after 9/11 for the first commercial Afghan Celular /Internet operator.  This unusual and rather dangerous occupation took him all over Afghanistan but as the local populous, regardless of allegiance quite liked the idea of making phone calls, he was generally welcomed in even the most hostile of places.  So what did 'Peckett of Kabul' suggest :

"Why not just take a conventional forward facing super bright LED bulb, stick it to a short length of orange plastic tube and wrap the tube in silver foil to stop the light escaping.  This can sit inside the side light housing along with another LED / clear plastic tube for the sidelight".  Simple.

11mm OD plastic tubes bought from ebay

The initial result was not encouraging with the tube seeming to attenuate the light significantly.  Polishing the ends (as we do with fibre optic cables for RF transmissions)  completely resolved this allowing the full intensity of the bulb to shine through.
 
ends polished up on fine emery paper and chrome polish

Pre-assembly

A few turns of insulation tape (blue in the photo) nicely brings the OD of the tube up to that of the LED.  The LED is then joined up to the tube using a short length of heat shrink. As the indicator need to be brighter than the sidelight, I doubled up on the orange.

two orange indicator lights should differentiate them from single side light

They are wrapped together to form a triangular shaped package which fits snugly into the sidelight pod.  If I need to access them in future it will involve removing the light from the wing but assuming the LED's live up to their specified life of 50,000 hours, this really isn't going to be an issue.
 Not having B9AS lamp holders to hand, I soldered tails directly onto the bulbs.  This is quite a tricky operation, requiring just enough heat to flow the solder without melting whatever else is connected on the inside.
Albeit some time ago, years of fault finding down to component level, removing and replacing integrated circuits with tiny soldering Irons lets me get away with this, but it's very easy to get wrong and with the LED bulbs currently costing over a fiver, not really recommended.


Lash up to prove the principle - fits neatly into light pod

The tails are wrapped to form a three wire loom which goes through a sealing grommet in the wing and is terminated directly into the IP66 junction box. (First picture on Post 47)
This is all very much a 'lash up' to prove the principle and subject to it performing as required will be developed into a rather more professional looking package.


Side light - very bright even in fluorescent light / daylight


Indicator in twilight - surely unmissable


Flushed with success, I now turn my attention to the brake lights.  I've never liked the idea of them sharing a bulb with the sidelight.  During my 140 restoration I added a set of red LED's to the number plate / reverse light to provide an additional and separate brake light.  I still had some red LED's left over and it was relatively easy to make up a similar arrangement setting them in a large grommet which simply sits around the reverse light bulb.  To complete the set up I replaced the remaining bulbs with LED's


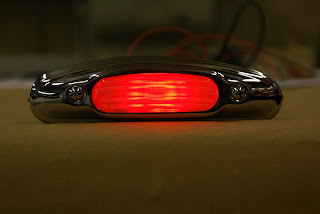
Brake light added to the reverse / number plate light - all LED's


Just the job

Miscellany
On my 'to do' list for a few years now has been the design and manufacture of a camping type chair that doesn't take up a chunk of space in an XK's limited boot / trunk.
Every once in a while, I've searched ebay for just such an item, half hoping that someone had invented it already to save me the trouble and half hoping they hadn't.  In reality, an ambition too far that I was content to live with rather than do something about.
With the rally season about to start and my existing space consuming camping chairs on their last legs so to speak, I had another look and their it was.  Made by Australian company Helinox, it weighs 836 grams and more importantly folds up into something approaching the size of a shoe box.  I bought a couple of them and they are quick and easy to assemble and very comfortable if a little wobbly.  With a capacity of 145Kg, even my portly frame only takes up 65% of the design max so it should be OK.


Helinox Chair 1 


Next post mid May