Friday 29 July 2011

POST 11 - JULY 2011 - CUT IT OUT BOYS


The front body section, now stripped bare and securely attached to the temporary wooden chassis, is precariously balanced on a trailer and taken to Auto Bodycraft at Stokesley for major surgery.  Alex drills out the wing to A post spot welds and cuts the first wing off along the line I drew earlier. 
As Ian from Contour Autocraft in Peterborough predicted, the bottom half of the dash side strengthener assembly, which is now totally exposed, is in a bad way and will need to be replaced.  Just how good or bad the remainder is, will be easily seen after Dastardly Dave Ferguson has been to work with his media blast machine. 
The other side wing presents a slightly different problem with quite a bit of lead loading where it meets the A post. This calls for a different cut line but still staying away from the large flat side of the wing. 
We decide to remove the old sills later, after media blasting has shown exactly how they are attached, thus avoiding unnecessary cutting and drilling.

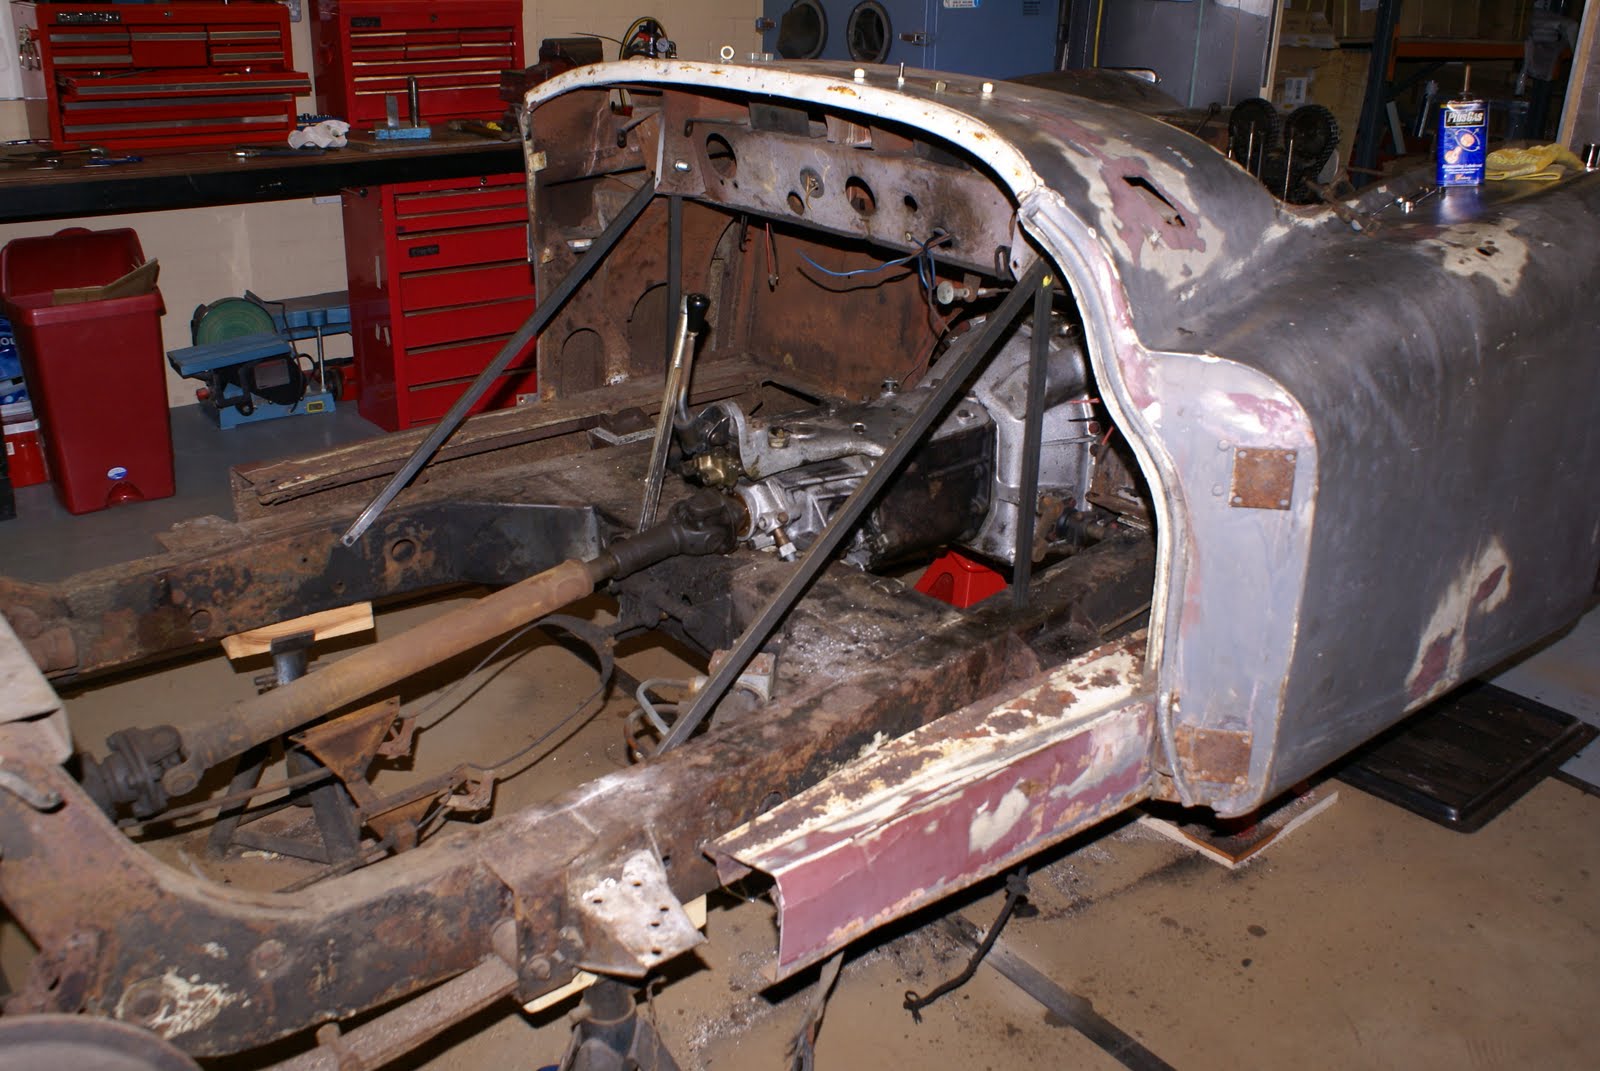
Strengthener assembly now fully accessible.  Will also allow
access to hinge plates for repair / modification.

Piece of front wing removed, is in remarkably good condition
with only a little surface rust

Not so for the bottom part of this assembly which is rusted
through and will need to be replaced.

Signs of lead loading around A post - probably the result
of an earlier repair to accident damage.  Will need a slightly
different approach.
My target was to have both front and back body sections, media blasted, etch primed and into Auto Bodycraft by the end of July, so just a few days behind.


Thursday 21 July 2011

POST 10 - JULY 2011 - XK NUMBERS LORE

When I bought the 120 I was aware that the engine number W3370-8 didn't match the entry on the plate - W2142-7.  Also, it didn't have a "smooth" set of cam covers which early XK's should have.  ( the front of the cam covers did not have the normal three studs each, and tended to leak oil)  an easy "give away" that its not the original engine for an early steel 120.  What is not so easy to work out is that according to Porter, the additional studs to cure the leaking where not introduced until engine number 4691, so why has my engine, very clearly stamped W3370-8 on both block and head, at around 1,300 engines too soon, got them?

The certificate from Jaguar Heritage confirms all other numbers and I pretty well concede that I haven't got a matching numbers car.  I can just about remember that at eighteen, I couldn't have cared less.  Now at sixty three, I'll probably wake up in a cold sweat, engine and cylinder head numbers flashing through my mind, financial ruin and JDC, JEC and XK club peers whispering behind my back - never trust a man whose numbers don't match - probably has a stash of pictures of non matching numbers cars tucked away on his hard drive.

Maximum effort must be made to remedy this. The http://www.xkdata.com/ site is a wealth of information and I easily establish that W33## engines were typically fitted to 120's around June / July 1951.

Looking back through the xkdata records, I spot my original engine number!  A strangely exiting moment.  Its now ensconced in chassis number 660232, another 120 OTS with modified bodywork.  Further research  reveals that this car was auctioned by Bonhams in April.  www.bonhams.com/eur/auction/19280/lot/348/   Sold for £52,100 including commission - wouldn't even cover the cost of the initial purchase and the bits, and just think of the fitted kitchen you could have bought with that sort of money !  But it must be correct.  Bonhams would surely have checked it out thoroughly before publishing the catalogue.

Just as this intrigue is reaching its peak I receive an email from Tom at http://www.classic-car-heritage.com/ who has been following this blog, an ex Jaguar employee from many years back, with access to original XK records.  He tells me that the factory records clearly show the engine swap from W2142-7 to W3370-8.  This is really great news.  Not some mongrel old lump from an ex banger raced MK7 in my 120, but a pristine new replacement engine fitted by the works, almost certainly built and blue printed with great care by Hassan and Heynes, overseen by Baily and signed of by William Lyons himself, then road tested to at least 125 MPH by Mr Dewis.  I just need to find the signatures, no doubt secreted away on some dark and rusty panel. 

To ensure a good nights sleep, I call Anders Ditlev Clausager at Jaguar Heritage.  Anders confirms the numbers as he has access to the same records and also adds some interesting points.  It was normal in the fifties for the Jaguar works service department to re-condition broken engines taken from customers cars and re-fit them as replacement units in other cars.  So it is entirely likely that W2142 was fitted to  660232 after being removed from 660295 which then had W3370 fitted.  I wonder whose car W2226-8 originally fitted to 660232 now resides in?

My final email of the day goes to David Bentley of XK Gazette fame.  If anyone knows the new owner of 660232, then David will.  I don't particularly want W2142 back but would just like to know for sure where it is and that its being properly looked after. A bit like an ex wife I would think - or not.


ID plates, now removed from body

Engine Number
and double stamped matching number on head,
 with 11 cam cover cover  studs, not 8
I would think that the smooth head puzzle is quite simple really.  At some time after the change to 11 studs on the cam cover the head was replaced with an un-stamped head by the works, or a main dealer with access to a proper number stamp, but they weren't happy with the first hit, so did it again.


Saturday 16 July 2011

POST 9 - JULY 2011 - GEARBOX AND AXLE RATIOS


Early 120's had ENV axles fitted instead of the Salisbury axle as fitted to my 140.  However, a little research indicates that the ENV unit is very robust and was fitted to Landrovers and some Armoured Cars.  I can only hope that it is in reasonable condition but will only really know on my first drive.  I would be happy to have it checked over by a specialist if could find one and be sure they genuinely knew their way around the ENV unit.

That old expression "In the land of the blind, the one eyed man is King" is, I have found to my cost on several occasions, very apt in the classic car restoration world.  How can I determine who really knows these units when I am clueless?

Two other advantages of the ENV axle are the apparent ease with which wire wheel hubs can be fitted and its 3.643 ratio. 

Some time back I was trying to decide the best gearbox solution for my 140.  The Moss Box was in a pretty bad state and the overdrive unit needed some attention.  After comparing specs for a number of different gearboxes I opted for a Classic Jaguar (CJ) 5 speed, based around the Tremec T5 WC (World class) unit.  The T5 unit with its 0.77 5th gear is excellent in the 140, but when coupled with the ENV diff will provide even better motorway cruising speeds nicely within the XK engine torque range.

 http://www.classicjaguar.com/  This is a brilliant site if you are not already familiar with it, mainly E types but XK's also, with literally thousands of detailed pics.


ENV Series One (JHS1398) Diff Label gives ratios as 14 / 51
which works out at 3.643  compared to 4.09 on the XK140


Spread Sheet originally written to compare XK140 ratios shows 120
 with ideal cruising speed of 73MPH at 2500 with CJ 5 Speed.  Perfect!


POST 8 - JULY 2011 - FRONT BODY SECTION REMOVED

The front part of the body looks quite a bit heavier than the rear and the enormous wings must stay in place with very little to support them.  It clearly needs some sort of base to sit on and this idea eventually evolves into replicating the front two thirds of the chassis.  The top surface of which, when viewed from the side, is completely flat, which coincides nicely with my two dimensional woodworking skills.
The steering column is extracted and all body to chassis fasteners are removed along with all pipes and wiring connecting the two parts.  Because of the weight, I decide to build a frame with four lifting points and use my engine hoist for the lift.  It comes off easily and the car is rolled back, the new wood chassis is positioned and the body lowered into place.  I had previously marked out a set of datum points on the car and replicated these on the wood chassis so that the fixing points would be precisely located relative to each other.


Chassis replicated in wood reinforced with inch ply for rigidity 

To ensure that the front bulkhead will go back in exactly the same place
with respect to the chassis I have added these steel bars.  They will
also support the body when the sills are removed.
Note the carefully executed product placement for plusgas


Lifted just high enough to roll the remains of the car back

Now sitting comfortably on the wood frame


Example of datum points previously marked up to ensure
nothing gets out of alignment - still needs a "tweek"
Steel support bars back in place on the wood chassis.
Bogey wheels also added.

Next job is to strip every single bit off the front body section, but not before many more photos are taken and sketches made showing the precise location of every cable route, clip, and many other miscellaneous items.  It will probably be a more than a year before these parts are put back, and as I can't usually remember what I had for dinner yesterday, this seems to be a sensible precaution.

Thursday 14 July 2011

POST 7 - JULY 2011 - DO YOUR WORST DAVE

With some trepidation I take the rear body section to Dave Ferguson at Hutton Rudby, Ace Classic Car restorer and Triumph TR expert, to do his worst with his sand blast equipment.  I know it has to be done and its probably going to make some sound looking bits a lot less sound, but what other options are there.  Some rust inhibitor and a bucket of filler would spare me the trauma in the short term, and after all, who would know?   Fortunately, Dave's been sandblasting delicate classic panels for years so knows how not to ripple those larger expanses of sheet steel.  He also knows that theres no point in "pussy footing" around corosion.  Every vestige of rust has to be completley blown away.  A few days later I return to see whats left. 
Apart from a few expected "perforations" it all looks straight, solid
 and intact. The  B post / shut panels, bottom of rear bulkhead and
bottom of tonneau panel will need replacing, which I already knew. 
 But just look at those fabulous battery boxes.  better than I could have hoped for.
As soon as blasting is completed, Dave sprays the entire, ultra clean assembly,
 with a light coat of etch primer to prevent new rust forming and to provide an
 excellent key for the next process.


Apart from some light corrosion along the top edge, the rear wings
are equally solid.  My 140 was completely rotten for the entire
bottom half.  Just how have these survived so well?
All in all a very satisfactory outcome.  The rear section and wings are now taken to bodywork Super Guru Alex Aitkin at Auto-Bodycraft in Stokesley to be repaired, have new metal let in, and then be honed and shaped to perfection.  The plan is to paint most of the inner body areas in the original factory matt black finish (unique to alloy and early steel 120's)  Other areas, typically under the wings will be finished in body colour Stone Guard.  The final paint finish will not be applied until the entire body is in one piece and in place on the chassis.

Wednesday 13 July 2011

SIXTH POST - JUNE 2011 - REMOVAL OF THE BACK HALF OF THE BODY

I cut through the sills just in-front of the rear outriggers then remove the three sill bracket to outrigger bolts and packing pieces on each side.  As I had guessed, the short piece of sill literally falls away from the B post, 45 year old filler being the only thing holding the two parts together.
To ensure that I can put the body back in exactly the same place (if required) I drill a few very small holes to reference the body to the chassis.
The remaining bolts holding the back half of the body to the chassis are removed.  Various brackets, fittings, pipes and wiring are removed until only the bare body remains.  Sounds easy when written down in a couple of sentences but this was actually a good days work.  Finally, with the help of three friends we lift it off.


These are the spacers between the sill bracket and the body outrigger.
The chemical reaction between the aluminium and steel has caused a quite
thick layer of crud (actual name for this anyone) to form on top and bottom
significantly increasing the overall spacer thickness.


Possibly a bit pedantic, but I thought it a good idea to measure the spacer pack
before and after cleaning.  Now 3mm smaller and certainly back to the original
size.  Did this reaction have the power to stretch the bolts and alter the body position?
Really must buy one of those new-fangled digital vernier calipers from Aldi for a tenner.

Taken after removal of the the body section, this clearly shows the
cut point in front of the rear outrigger and the level of corrosion at the
joint between the sill and the B post / shut face panel.


Rear body section finally off, with a little help.
You can see from their facial expressions that these guys genuinely believe that I'm totally nuts.


Looking not too bad, but the man with the big sandblast
machine is still to be let loose.