Sunday, 2 December 2012

POST 43 - DECEMBER 2012 - ODDS & ENDS

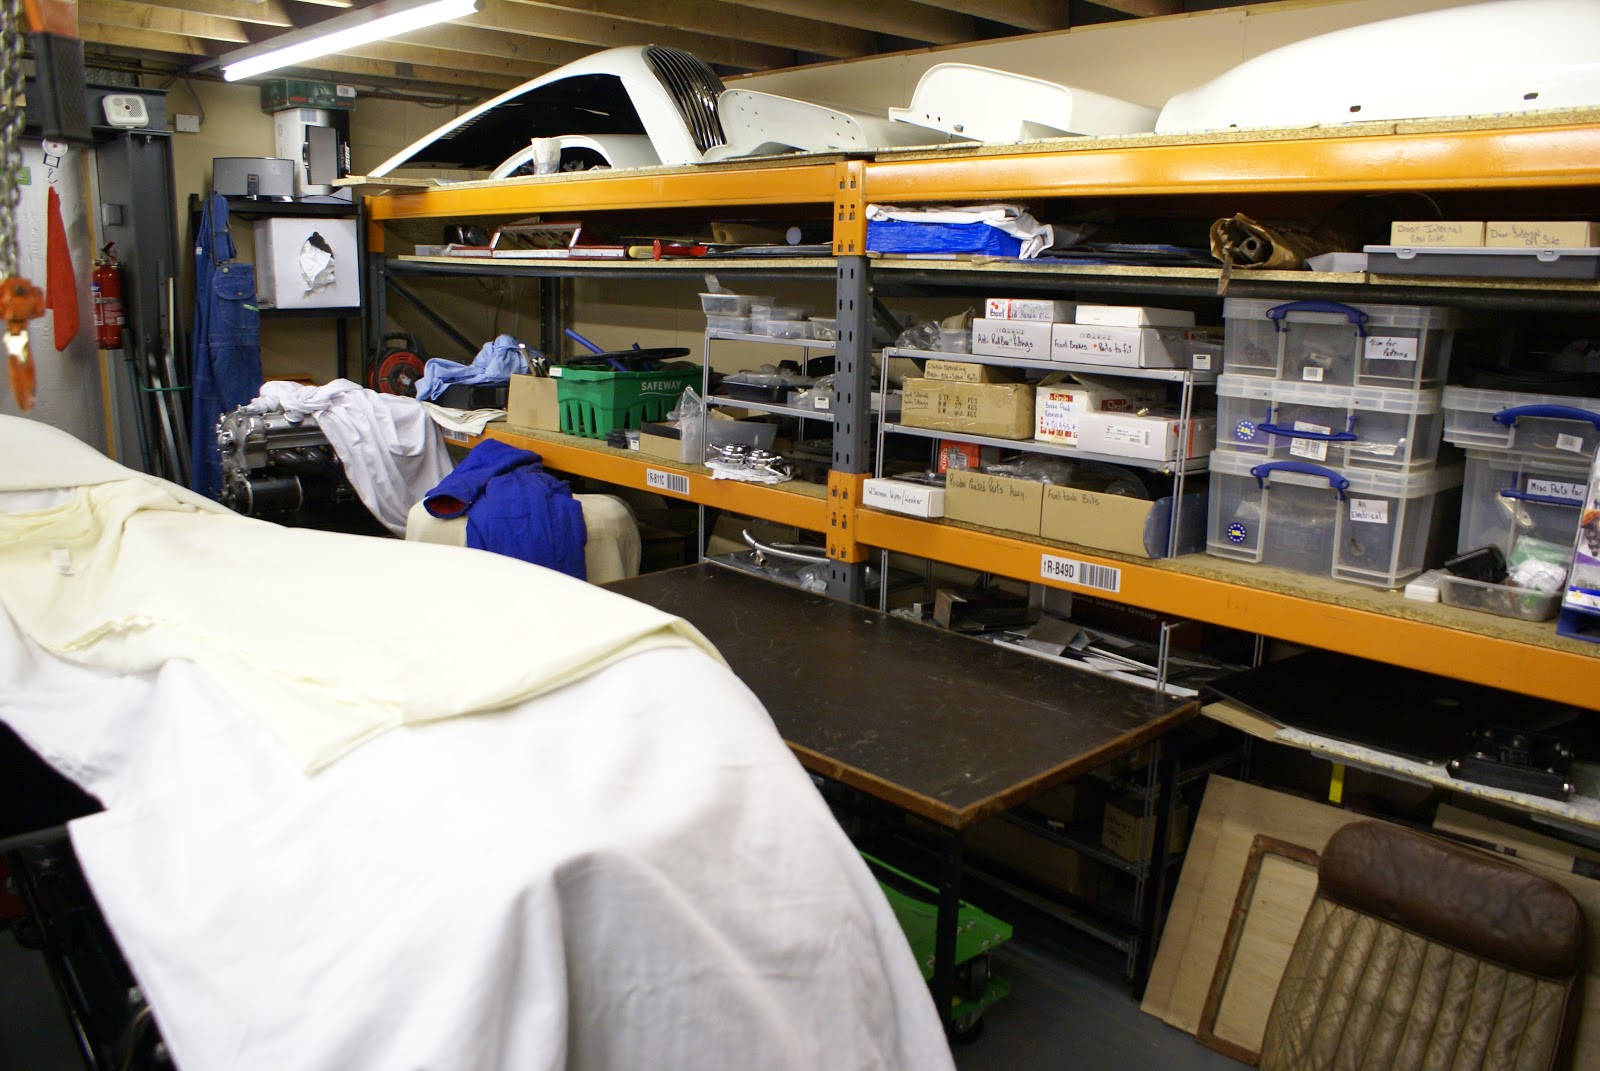
A bit of a mixture of stuff going on at just now.  Even allowing for the expulsion of all none XK120 related bits from the workshop it's bursting at the seems.  I suppose that this is the point in time when maximum space is required, just before some of the more space consuming parts are re-fitted. 


Every shelf and horizontal surface now occupied - can only get better
I seem to have spent a good deal of time ensuring that the body is correctly fitted back on the chassis but with 5mm rubber replacing the water absorbing and rust inducing felt originally used.  This will also be used between the chassis and the floor boards when I eventually get round to fitting them.

I've finally decided on the Coach Trimmer or should I say after I was 'interviewed' he considered me a suitable client.  John Richardson of Shildon comes very highly recommended by several friends and acquaintances.  He previously worked for David Royle at Barnard Castle, a restoration company with a huge reputation, and used by London's Rolls and Bentley specialists.  Alas Royles went out of business a few years back mainly I understand through some rather large unpaid bills.  Anyway, John decided to set up on his own but restricts his activities to one job at a time and works by himself.  On my first visit, he was busy making a pair of new but old looking seats for a fabulous Delahay race car which almost filled his workshop.  Certainly no doubts about his trimming credentials then.  
My car is booked in for the full works, upholstery, door cappings, carpets, hood, side screens and tonneau and will be away for two to three weeks in March next year, but in the meantime I can send John a few parts to be getting on with.
Having finally decided on Old Red and Biscuit, my amateur effort of trimming the dash in red leather back in spring 2011 now needs to be re-done in biscuit with red edging. 

All to be re-done in biscuit with old red edging
I've decided to change the seat backs to bucket style and order a set of seat frames from Aldridge, trimming company.  The bases are longer and a little thinner than the originals, but very sturdy and well made and will still hinge forward to access the area behind the seats.  This also means that I can increase the height of the central arm rest by a couple of inches to incorporate a storage area.  In all other respects it will look identical to the original. 

New central arm rest, now with storage and ICE controller
The plan was to install a Pure Highway 300i DAB Radio and iPod interface / controller under the hinged lid. Only problem is that they seem to be sold only by Halfords who don't have any, so may have to re-think this, but in any event I don't want any ICE kit on show.
Pure Highway 300i controller will sit nicely
in arm rest storage and also control iPod.
Just need to find one!
With the exception of front disc brakes which I can't do anything about, I really don't want any of the many upgrades I've planned to be seen and this includes hiding away a secondary wiring loom for the ancillary equipment.  To this end, an additional four fuses are required, which need to be accessible but out of site.  The RF95 Voltage regulator is really now only required as a terminal block as its innards have been made redundant by the fitting of an alternator.  The space vacated by it's coils and relays makes an ideal home for a neat little fuse assembly.


Four way fuse box now lives in RF95 Voltage Controller

Side View - looks like it's always been there and will disappear
entirely once the cover is in place.
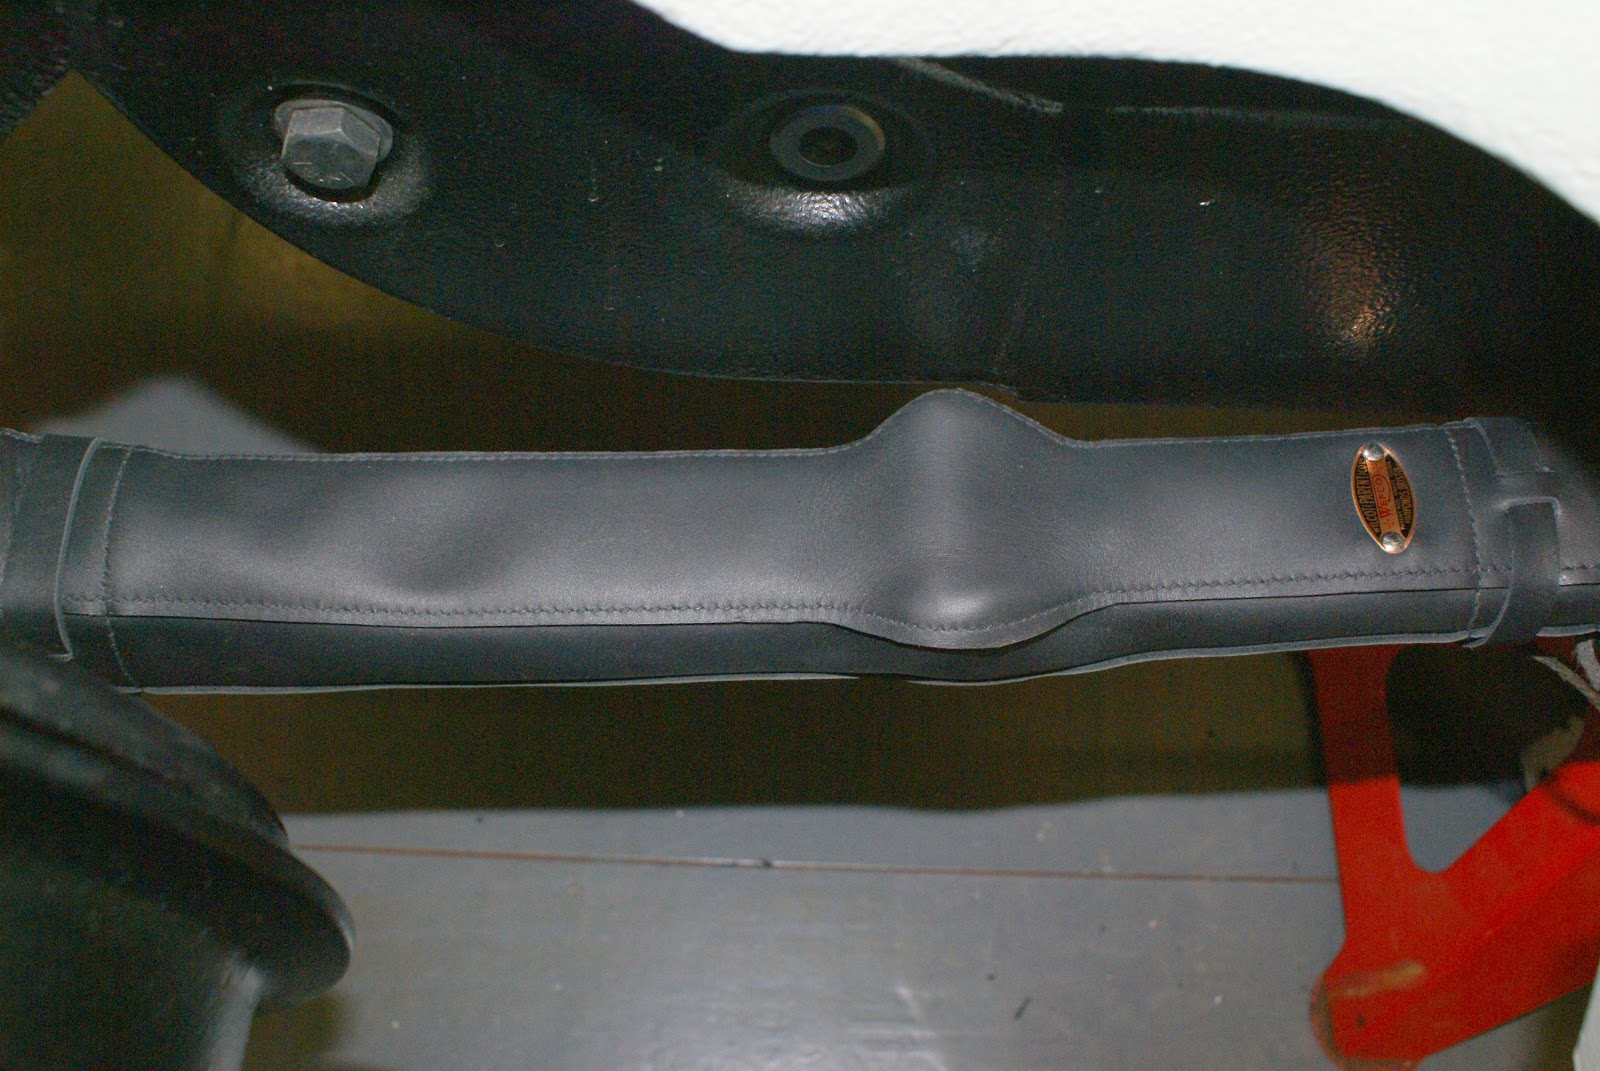
One job that I intended to do as soon as I got the body back onto the chassis was to check that the door gaps were still as perfect as they were at the body shop when mounted on the jig.  Ideally I need the rear wings back on before this can be done properly, but I need to fit the spring gaiters and locate the correct wing beading before I fit the wings.  The gaiters were sourced some time ago from Wefco and I actually spoke at length to the lady who was going to sew them together which was rather nice.  They looked pretty good before fitting but look superb once sewn up on the springs.


Beautifully made rear spring gaiters by Wefco

Fit on original springs is perfect.  
I understand that on early steel 120's, the beading between the rear wing and body was made up from rexine over paper cord then painted body colour.  I have managed to source some exterior quality Vinyl (normally used for hoods) which looks similar to rexine and is almost an exact colour match and this will be used to make up the beading.
 
My recent visit to the Classic Car Show at the NEC started very well.  The entrance to the exhibition was dominated by a beautiful 120 Roadster on a pedestal, who's first owner was Clark Gable.  This car has been restored at very considerable cost by JD Classics and went on win best in class at this years Pebble Beach Concours.  With such a prestigious win, I would expect it to be technically correct in every tiny detail, meriting around thirty photographs for future reference.


One off special colour by the factory - became known as
Gable Gray.    Note rear wing piping in body colour.
 Pity they wouldn't let me open the bonnet and boot.  I was reliably informed by it's temporary custodian / security guard that this was not possible due it's value of £3.4 million!  With Chassis No 670003 it's certainly worth more than a later aluminium car at say £250K but how much more will the Gable connection influence it's value?

Clark Gables 67003 - Value £3.4 Million? - Unlikely but who knows
Miscellany
The stream that runs thirty meters from my front door has a normal level of around three meters below my damp proof course.  Up to the 27th of November it had rained almost continually for four days and I must say I was starting to become a little concerned when I could see the level rising by the hour until it was almost over the top.  This is in spite of a very expensive flood relief scheme built in 1979.  A little research revealed that we are still in a 'zone 3' area which effectively means we can expect to be flooded once every one hundred years or so.  With thirty odd years gone, the odds are shortening!  Fortunately the rain stopped a and within a few hours it was back to normal.


Next Post mid December

Saturday, 17 November 2012

POST 42 - NOVEMBER 2012 - ELECTRIC WATER PUMP

I know I've mentioned this a few times in the past but just to re-cap:
A few years back, my 140 suffered from overheating on hot days and nasty heat soak issues. I more or less sorted this with an aluminium radiator, larger fan and additional electric fan, but also looked around for some alternative solutions.
An email conversation with an Australian enthusiast revealed that a common solution in the very hottest parts of that continent is to fit an electric water pump and to this end a company called Davies Craig manufacture just such a range of devices.

Davies Craig EWP115 Water Pump from Australia

A little research highlights a few other benefits:
A conventional pump is most of the time creating much more flow than needed but more importantly, sometimes not enough. With proper control, an electric pump's speed / rate of flow is determined entirely by engine temperature with the flow continually adjusted to maintain a 'set temperature point' regardless of external temperature and load.  This also negates the requirement for a thermostat and by-pass hose, thereby simplifying the cooling system.  The Davies Craig control system actually goes a little further. 
Temperature sensor will live where the Otter switch once resided.
A manual choke switch will take over from the hit and miss Otter.
On start up, to minimise engine warm up time, the pump just pulses, to avoid hot spots forming around the cylinder areas, then gradually ramps up to normal operation and maintains the 'set point'.  This can be programmed in anywhere from 75 to 95 degrees for either max performance or max economy.
Switch off and the pump will continue running just long enough to resolve the XK engine's heat soak issues.  The Control unit also operates an electric fan to work in conjunction with the pump.
Given that the Alternator is mostly generating unused power, and some of this is now running the pump, its a bit of a free ride, and with no belt driven mechanical pump, will give a small but real increase in engine power. 

Apparantly, the normal approach to installation is to simply remove the impeller or vanes from the existing water pump.  This means there are no belt or pulley issues to worry about, but the angle of the water inlet, at least on my car, pointing downwards makes the pump and pipe arrangement very awkward.  Additionally, it would be good to create some space behind the radiator to accommodate an electric fan.  I am also not happy about wrecking my original pump if the whole scheme ends in tears, which is entirely possible.  It shouldn't be too hard to make up a blanking plate with a water inlet pointing the right way so this is my starting point.

First try.  Shame it's destined for the scrap bin.
The inlet comes from the old radiator top hose fitting, cut down and welded to an 8mm alluminium plate, cut and filed to shape.  The plan is to simply drive the dynamo (now an alternator) directly from the crank (bottom) pulley.  Only when I try to establish the new V Belt size does it dawn on me that the dynamo adjustment now forms a perfect arc around the bottom pulley, so without the water pump pulley, the V belt cannot be tensioned.  Clearly whats required is a blanking plate which can incorporate an 'idler' pulley in place of the water pump pulley.  I roughly draw up what I think is required and contact proper engineer friend Christian for advice.

Now with added idler pulley - My drawing as a starting point
CAD / CNC drawings and machining.

In spite of his occupational workload, young family and ongoing E-Type restoration, Christian still finds time to convert my drawing into a CAD format and arranges to have the parts produced  using CNC water jet cutting and milling.

Converted into a proper CAD drawing

And then into actual parts - Everyday stuff for these guys but still
amazing to me.
Christian very wisely gives me the component pieces to play with before they are all welded together and it soon becomes obvious that the idler pulley idea is a complication we could do without.  Also the different water pumps and pulleys used throughout the XK engines life would mean that this aspect of the design would need customising for each iteration.  Another friend, Neil suggests using a pulley on the back of the belt (Cam belt style) as an alternative and the following day drops by with his collection of used cam belt tensioners (What else do you collect Neil?)


Cam belt tensioners - Good idea Neil, and nicely followed
through with a selection to choose from.

The simplest from the selection turns out to be a perfect solution.  Amazingly it fits exactly onto the block which was originally intended to hold the idler pulley bearing housing and I just need to have a special stepped bolt made to accommodate it.  I do have one small problem, I have no idea which modern car it is used on so if you recognise it please let me know. 

This is just so simple it's almost elegant - and it works a treat.
Much easier than adjusting the dynamo.

Just needs plumbing in.

The rest of the job is basic plumbing but needs to look good.  I think the pump will be located  just behind the RH front engine mount where most conveniently the block has a couple of bolts attached which appear to serve no purpose.  I can attach to these, some form of 'tray' with rubber base which the pump will simply sit on.  The inlet pipe to the blanking plate needs a heater inlet fabricating onto it and I am now wondering if  a booster pump should also be used to ensure the heater matrix is provided with a plentiful supply of hot water.  Anyway, that can all be sorted out in due course and I really need the engine back in before I start to seriously look at the plumbing part of the project.  I would expect that to happen around next spring.

Miscellany
Classic Car show at the NEC tomorrow - (Sunday 18th Nov)  Travelling down by bus, arranged by TYMC (local car club) Round trip of 360 miles - cost £18.00 !!!  Delivered to the NEC front door, no parking hassles or charges and I can read, talk or sleep all the way there and back.

Next Post beginning of December.

Sunday, 4 November 2012

POST 41 - NOVEMBER 2012 - BUMPER CHALLENGE

With the body correctly fitted to the chassis and an initial measurement of the door gaps also looking good, confidence is high.  Contemplating what to do next, I start thinking about the complexity of the front bumper mountings.  I have a vague recollection of the assembly being made up of quite a number of parts and have a dig around until I discover the the box of relevant bits and a few notes I'd made when dismantling.  The front bumpers are fastened through the body with extended screws to a heavy steel bar running inside the full width of the body and in front of the chassis.  I've had this bar powder coated satin black and decide to temporarily pop it into place to get a better idea of what's involved.  I was always pretty good at Chinese Puzzles, but there is no way that I can wheedle the damned thing into place.  Before giving up I post a question on Jag Lovers Forum asking if anyone can help.  Back comes the answer - yes its extremely difficult but possible. Only problem is, no one can remember how they did it.

Bumper support bar, henceforth known as 'That Bastard Bar'
Over the next few days, this develops into a 'Visitors Challenge' and many happy hours are spent with various restoration aficionados spending hours prostrate, skinning knuckles and cussing.  In the meantime I busy myself sorting out the various other bits and pieces for both front and back bumper installation.

Over 30 parts per side.  Body sits between rubber washers.
Note - Bumper Iron is body colour and support bars behind are black.
By the Weekend I've concluded that the only way to resolve this is to lift the body back off, which looks like a depressingly large amount of work.  In common with most restorers I absolutely detest retrograde steps, so clearly the best approach is a couple of days R&R in preparation for the task.

Months ago I committed to write a review of Bernard Viart's new XK120 Explored book for JDC Magazine, as soon as it became available.  I received an advanced copy on the 25th October so this undertaking served as a welcome distraction. By Sunday afternoon I'm thoroughly bored with my computer screen and ready for some retrograde action.  Including rigging up a couple of hoists, the entire operation took just two and a half hours and by 4.00pm I have the body suspended 18 inches above the chassis and the bar loosely fitted in place.

Body now swathed in protective flannelet and suspended on two hoists

'That Bastard Bar' finally in position
The only items I'm not entirely happy with are the four screwed extensions which hold the bumper brackets to the support bar.  Although only the hex-nut part is seen they do look a bit rough.  Rob at Romax Powder Coaters takes them in to see what he can do, and a couple of days later produces a brand new stainless set, knocked out on his lathe at home - amazing!

Thanks Rob at Romax Powder Coaters - Lovely surprise.
Fitting up the extension screws with the various spacers and sandwiching the body between the rubber washers whilst ensuring that all the angled bits are correctly orientated is fiddly and takes a bit of practice, but by the time I'd done the fourth one I had the job down to a few minutes.  I'll leave the bumper Irons in place to hopefully afford some protection to the body during the fit up.

Hard to believe that this


became this.


and then this

Water Pump Conversion
Still not got my bits back from the machine shop, but am advised that the new housing / inlet is being made up in stainless rather than aluminium.


Miscellany

MXK 120 - Another 120 OTS
Jill Thompson bought her 120 OTS project a few years back for her handy man Andy to restore, but it was delayed because a house restoration took precedence.  With both house and garage now completed, the time had come to awake the car from it's slumbers in a local farm shed and introduce it to its new home just a few miles from mine.  And so it was that last Sunday morning I gave Andy a hand to move it.  Fortunately for Jill, Andy's quite an conscientious sort of lad with a good work rate, so as long as he's kept focused and not distracted with his wood chopping and burning obsession, it shouldn't take him too long.

Deja Vu   Reg MXK120   XK120 OTS    660386
Photo - October 2012
My car Reg KRU600   XK120 OTS    660295
Photo - December 2010
 
Chassis Number 660386 was registered in December 1950, the same month as my car (660295).  It's remarkable that it lived the dormant part of its life in Teesside.  I actually saw this car as a stalled restoration at a local paint shop back in 1976 and often wondered what became of it.  As a project, it's fairly similar to my car but is complete with bonnet, boot lid and windscreen.  It has a light coating of surface rust but is generally quite solid.  It will probably need the same bits replacing, sills, B posts etc. but needs a bit more work around the headlamp pods.  Engine and gearbox are removed but came with the car.  Andy still has a few more jobs on his 'to do' list and tells me that consequently the most likely start date proper will be June 16th  next year.  Something familiar about that date.


Jill says it all looks pretty straight forward and Andy can crack
on just as soon as he's got rid of the rabbits and put the clock right.
    Note Registration Number.
This brings the total of XK120's that I know of, within say a 20 mile radius to seven, five of which are Roadsters (OTS), one Fixed Head and one OTS Replica but with mostly XK running gear and trim, also a C Type rep with a LHD 120 OTS Chassis plate. 


Next Post Mid November

Monday, 15 October 2012

POST 40 - OCTOBER 2012 - BODY BACK

If there is one thing I've come to rely on in the world of Classic Car restoration, it's that things rarely happen when they're supposed to.  Consequently it was something of a pleasant surprise when Alex phoned to tell me my body would be ready for collection in a couple of days. 

Last time I saw the body it was clearly getting close to being
painted but it still came as a pleasant surprise to get the call.
Scheduled for the end of October it's effectively over two weeks early and I had to put in some extra time to finish the chassis prep.  Fortunately wife Angie is on holiday (again) so the only limitation was staying awake.
I was then finally faced with having to take the decision as to whether or not the engine should be taken back out.  Fitting out the engine compartment will be so much easier without it and the potential for paint damage a good deal less.  It will also make the work a great deal more pleasant.  On the other hand, I need to add a couple of days for the extra work and will then need to take great care not to cause damage re-installing it.  I've had some practise with the 140, so this doesn't particularly worry me.   On balance and against some sage advice I hoist it back out of the chassis.
Friend Geoff obliges at short notice with his covered trailer and on Friday 12th October we load the chassis and head of to the body shop.


Ready to lift the body and roll the chassis under it 

If you remember, the body was initially built up using the chassis as a jig. The various shims were fitted and panels tweaked until everything was correctly aligned.  It then had braces fitted and was transferred to a specially made frame which allowed me to build up the chassis whilst Alex finished and painted the body.

The aluminium shim sets are put back in place on the outriggers and after a brief discussion on the best way to proceed, four of us lift the body whilst one other pulls out the support frame and rolls the chassis under the body and into place. After a bit of a shuffle everything lines up beautifully and the four sets of three bolts are dropped into the outriggers. The 6Nr 1/8" reference holes I drilled in body and chassis before removing the body over a year ago are checked and are all spot on. 

How easy was that !!  Torsion bars were wound up after engine
installation so body now sits high with weight reduction.
Note bracing bars still in place.
Within an hour of arriving, we are loaded up and on our way back to my workshop.  It's odd to think that this was one of the few aspects of the project that really worried me, but turned out to be very straightforward.

Saturday morning I get to have a quiet hour or so looking at the detail and overall finish and am blown away by the general quality of the work.  White cars often look a bit flat, but this has a real depth and shine to it.  I'm also very happy with the satin black finish to the inside parts (as original) and appreciate the additional time spent to mask up the car to achieve this.  There is no question that Alex and his crew have gone the extra mile but will no doubt reap the benefit when the local Classic Car community see what has been achieved.

New home for the next eight months so precise location within
the workshop on axle stands is essential

After lining the car up exactly where I want it, I put it up on axle stands and remove the wheels giving me maximum access to all areas.  First job will be to slacken the bolts holding the bracing bars setting the door top distance.  If the body is correctly shimmed and 'relaxed' the bolts should be free to pull out.  A trial fit of the doors will follow before they are again stored on the top shelf out of harms way.

Just before I leave on Saturday, I need to do one last thing.  I gingerly fit the first piece of chrome to the body but quickly remove it after remembering Alex's strict instructions about allowing a couple of weeks for the paint and lacquer to fully harden.  The photograph below represents the start of the next and hopefully most enjoyable part of the project.

Essential temporary fit of first piece of chrome.  Strange how
the colour varies in this set of pictures, but on my computer
screen I think this shot most closely matches.


Workshop fluorescents - apparently the reflections are a measure
of the quality of the job and I am told by a man who knows a thing
or two about body work that these are "tip-top"
Electric Water Pump
The design of the new water inlet and idler pulley assembly is now complete and in a CAD format for the CNC boys. I am awaiting a quote for the initial sample. 


Miscellany

Tees Cottage Pumping Station
This Victorian water pumping station houses a magnificent beam engine, restored and put back into working order some years ago. The group of enthusiasts who maintain it occasionally steam it up for a day at a cost of around £400 for a ton of coal.  The annual October event includes a gathering of Classic Cars and a very pleasant and sociable Sunday Lunch at the local Pub.

1904 Beam Engine built by Teesdale Brothers with massive 30 foot beam. 
Originally commissioned to provide drinking water from the River Tees

Running at I would estimate about eight cycles a minute, the
motion is so smooth that coins can be balanced on edge on
vertically moving parts of the mechanism (next to the big nut)
The site also houses a 1914 two cylinder Gas Internal Combustion Engine, again in full working order and running from mains gas.  The oil in a drip tray under a bearing had clearly been emulsified with water, but as the engine has no cooling as such we were left wondering how it got there.  A number of fanciful and highly technical hypothesis were put forward by the gathered experts and enthusiasts when the engine operator appeared and looking up explained "roof leaks"


1914 Gas Engine believed to be the largest of its type in Europe
Dropped Valve
Went for a mid week run out to Nidderdale in the 140 and called in to see fellow XK enthusiast Dennis Wheatly.  Dennis is mid way through a Mark Ten restoration but is being frustrated by the lack of progress of his chosen paint shop.  He also has a Mark Ten spares car which had a bit of an engine problem.

Now that's what you call a 'dropped valve'
JDC and Triumph Track Day at Croft  Sunday 14th October
JDC Area 11 Hired Croft for the day and shared out the cost mainly between forty Jaguar and Triumph club members plus a few other makes.  Divided into four groups according to experience we each had around one and a half hours track time.  With no more than twelve cars on track at any time it made for a brilliant and relaxed day. The 140 performed faultlessly and the Michelin Pilot tyres continue to impress with their excellent grip then very gradual move to over-steer.  I typically made up three of four places in my group on each session,(intermediate) but was never passed.

No oncoming traffic and no speed limits, just fun!
 At 64, it's interesting to note that an extended adrenalin rush now produces a slight but not unpleasant tremble.

Next post beginning of November


Thursday, 4 October 2012

POST 39 - OCTOBER 2012 - NOTHING SPECIFIC

When I occupied my workshop and completed the 140 restoration, the empty shelves were too much of a temptation for me not to take the opportunity to 'de-clutter' my garage at home.  I promptly filled half the space with various bits left over from previous restorations, mostly parts just a bit too good to bin, with the promise of a trip to the Beaulieu Autojumble one day to get rid.

With the addition of lots of 120 parts now stacked up and ready to fit, all the shelves are pretty well full.  I agreed with Alex at Auto Bodycraft some while back that I would take delivery of, and store the boot lid, bonnet, doors and rear wings once finished, and it looks as if that time is imminent.  I'm just pondering where it's all going to go and I take a phone call.
 
A lady in a nearby village whose recently deceased husband ran a string of XK's in the seventies and eighties has a few Jaguar bits and pieces she wants rid of.  Would I be interested?  My response ought to be - no thank you, absolutely nothing I need, but amazingly, I hear myself saying - Oh yes, most definitely, with mental images of C type heads, and sand cast carbs.  A couple of days later I find myself in a double garage full of a lifetimes collection of bits, all just a bit too good to bin!  (sounds familiar) Under the bench sits a complete XK engine, two blocks and a head, a shelf above has a mixture of not very exiting SU's.  The bench is piled high with old tools.  The complete engine LA4426 is from a 3.8 MK11 and turns over OK.  One block V7453-8 is from a 150 and the other N9961 is from a MK7 or 8.  The head, complete with cams and covers NE1364-8 is from a MK9 and looks almost new.
Again I hear this other person who is actually me, making a ridiculously generous offer, only to have it rejected!  Phew, that was close.
A week later I get a call asking if I've changed my mind and I explain to this very sweet and quite elderly lady that to pay more would simply mean that she would have all my money and I would have all her storage problems.  Oh she says," I never really thought of it that way, but seeing as you seem to be such a nice young man, I'll accept your original offer after all, as long as its cash".  Properly ambushed, I foolishly agree and collect the bits a few days later.
Now I really do have a major storage problem looming and determine that it will have to be resolved.  Mate Andy has his 120 OTS project stored in one half of a quite large, dry and secure farm building, ten minutes from my home and I enquire if the other half is available for rent.  Yes it is, its around 300 square feet and the rent is £5.00 a week.  Problem solved.  Everything non XK120 including the accidentally purchased engines etc.are transported over and I'm left with plenty of space for the 120 body work bits.

Engines and other bits occupying just a corner of my new fiver a
week storage facility. 
A momentary flash twenty or so years into the future sees some 'nice young man' in my cluttered garage having a conversation with my aged wife Angie, about the best way to dispose of a lifetimes collection of car parts, all just a bit too good to bin!

This diversion and the Digital Switch-Over has meant that I have actually achieved very little in the last couple of weeks, but Alex the body work man has made up for it.  The threat to fix a very large Count Down Clock to the wall next to my bodywork seems to have had the desired effect. I do however, suspect that Alex is in fact a consummate 'brinkman' thinking nothing of starting at 4.00am to catch up, and progress would have been the same regardless of my threatened interventions.


All seams have now been carefully sealed to prevent any
possibility of future moisture ingress

Door ready for paint.
Stone guard on bottom edge blended into face.

Inner rear wing, more stone guard, ready for paint

Very fine stone guard on underside of bonnet, will be painted
satin black as per original.  Note fixings down centre to
accommodate aluminium water deflection plates.
Photo Shoot
Another interesting development stemmed from a chance meeting at the Croft Revival event and a discussion about the problems of photographing cars.  It transpired that the man with the camera was at the end of his final year of a three year commercial photography course, and was looking for a candidate for his final piece of degree work - nine pictures on the theme of Best of British.  What better than  Jaguar XK's.  The clincher was the discovery that in addition to a nice 140 fixed head, I also had a mint rolling chassis in my workshop.   The technical aspects of this project are mind boggling, with very special (and expensive) cameras that can maintain pin sharp focus over varying distances and many different types of lighting.
For my part I have been more than happy to spare the time and generally facilitate some of the more unusual requirements.  To take the required picture of the rolling chassis, the workshop was draped in white sheets and the floor covered in white card. 

My 'snap shot' gives an indication of the preparation required
The entire chassis was carefully cleaned then rolled outside and the tyres were scrubbed spotlessly clean and had some none shiny dressing applied.  To prevent getting the treads dirty on the roll back in they were wrapped in cling film.


It may all sound a little O.T.T. but I have now seen five of the nine images in their final A3 form and would have to say that they are quite extraordinary.  Not really photographs in the conventional sense but more akin to some sort of fine art imagery.  Hopefully with the permission of Mark Johnson, the photographer, I will eventually be able to show them on this blog, but am very aware of the huge amount of time and expense incurred to achieve his goal.  I plan to have a large (48" wide) picture of the rolling chassis framed up and hung on my study wall.

Electric Water Pump Conversion
No, I've not forgotten about this, but it has become rather more involved than I intended.  Rather than butcher the existing water pump I have drawn up a new front plate with water inlet and idler pulley.  Its currently been converted to a CAD drawing for CNC machining but it's likely to go through a few iterations before it's exactly as I want it.  If it looks right and reliably does the job, I may get a few made up and sell them to recover the cost.  If not, it will be quietly abandoned.

Next Post  Mid October


Tuesday, 4 September 2012

POST 37 SEPTEMBER 2012 - PAINT SPEC

Some considerable research has gone into establishing the paint finishes originally used.  Whilst it would be good to maintain this originality, the predominant consideration has always been to ensure a long and rust free future.  I've had a good deal of discussion with Alex, the man responsible for the bodywork and paint and we jointly concluded that a number of different finishes / processes would best achieve an acceptable compromise.  This did become a little complicated resulting in the production of the inevitable list.

Paint Spec – August 2012 
Paint System - MIPA - Two Pack  totally none water base.                   
Colour - White 0802 Fiat / Alfa / Lancia 268A  Bianco Bianco Standard

Seams
All to be washed in or beaded.

Fine stone guard / satin black  (Sample Satin finish before painting)
Engine compartment – includes panel above bonnet hinges
Underside of bonnet
Water shields for bonnet (to be fitted later)
Inside Boot except hinge panel (see white)
Top of Petrol tank under-tray
Inside of front inner wing panels
Front bulkhead passenger compartment side
Under front Scuttle panel & Dash fixing assy.
Inside boot lid including ash frame. Excluding aluminium side trims

Satin Black  (Sample Satin finish before painting)
Battery box panel    All areas behind seats
Side screen storage area

Fine Stone Guard / Matt Black
Transmission Tunnel Cover
Gearbox Cover

Fine stone guard / White
Inside door panels and inner faces (over sound deadening pads)
Door lower inner panel Vertical & Horizontal
Inside Heater Blower box to be fitted under wing

Stone guard / white
Door bottoms where exposed to road chips
Wing bottoms where exposed to road chips
Heater Blower Box / Front Cover to be fitted under wing
Outer sides of inner wing panels
Inside wings and splash panels
All underside body panels at rear
Bottom of petrol tank under-tray
Head Lamp Pods

White (where not obvious)
Bonnet return
Boot Rear hinge panel inc. side pieces
Boot lid prop support
Door front & rear shut face panels
Inside fuel filler and lid assy.
Number plate carrier - all

Black Stone-guard where accessible.   Wax-oil after final paint
Dash Side strengthener Frames
Front part of A Posts
Rear of B posts, drill and plug closed box after wax-oil injection
Inner side of splash panels
Inside sills including top section

Satin Black Powder Coat (All by Romax)
Fuel filler pipe cover
Bonnet Catch Assembly
Bonnet and boot hinges
All suspension parts
All Misc. Brackets


The final decision on colour was made by simply looking at modern cars and choosing a similar creamy white that I think looked something like the original, which is described on the Heritage Certificate as Cream.  This is contradicted by the first owner, Vernon Maitland, who is very definite that it was in fact white.  According to Urs Schmid, Old English White / Cream was not a standard colour until December 1952 but the Cream / Ivory available up to that date is nowhere near the cars original colour so I can only guess that it was ordered in special colour.  The obvious question at this point is how do I know what the cars original colour was?
Before the car was taken back to bare metal absolutely everywhere, I removed and retained the cover over the fuel filler cap and carefully sanded it back to reveal the cars paint history.


The consensus is that the cover (and presumably the whole car) has been repainted three or possibly even four times but always exactly the same colour, most likely Old English White.
Considering it was incontrovertibly only on the road from 1950 to 1965 this is remarkable. The last owners business was the supply of equipment and spare parts to Automobile spray shops which may or may not be relevant.
I will have the fuel filler cap cover finished over the previous layers of paint so that some future owner in another fifty or sixty years can have the pleasure of uncovering its paint provenance, probably using the accelerator mass spectrometer / carbon 14 dating app on their mobile device!


Old English White as printed in Urs Schmids 120 book compared
to my 120 fuel filler cap.  Interesting how this colour looks so
different from the previous close up picture.

Cartoonist Giles 120 in Old English White

Powder coated wheeles are matched to Fiat Bianco Bianco
Its impossible to accurately show these colours on computer screens, which just add to the differences in camera translations, reproduction and printing processes.  To entirely bypass this I first took a swatch of the Fiat Bianco colour to the powder coaters and had them paint a sample piece of tube which I then checked against an actual car.  Very very close, and as the wheels are separated from the body by the tyres, you'd never detect the difference.  I will have Alex do the same with a two pack paint sample checked against the same car, and again once the whole batch of paint has been mixed. 

I'm probably a little over obsessed with this colour issue but this is partly due to my 140 being painted in a slightly different and unusual BRG 'hue' than I intended.  Entirely my decision / mistake, but it's delicate olive shade has solicited a good many surprisingly positive comments - or are they just being polite?

Tuesday 4th September - ENGINE START UP DAY
With everything checked and double checked and my order of 15 litres of Millers SAE30 Running In Oil arriving this morning, it suddenly dawned on me that the moment had arrived, nothing left to do but push the button.  I will cover the run up, the 'event' and the outcome in some detail in my next post.


Miscellany

The Eskdale Run - Sunday 3rd September.
This is organised by Teesside Yesteryear Motor Club (TYMC), the club that Jeremy Clarkson had a pop at a couple of years back, on his sometimes entertaining but mostly repetitive Top Gear show with the comment : 
"How much do I not want to go out to dinner with anyone who is a member of that club.”

Eskdale Run starting point, Middlesbrough Motor Club.
Founded in 1905, it's most famous son being Freddie
Dixon of racing Riley fame.
Starting in Teesside the Eskdale takes in some of North Yorkshires most magnificent moorland / dales scenery with a lunch stop at Grosmont, the Moors Steam Railway centre.  Hugely popular, it is invariably over subscribed and is generally scheduled to coincide with the best showing of Heather on the more remote moorland slopes.

Typical view of the North Yorkshire Dales with the North
Sea just visible over the horizon
A great day out for enthusiasts, with cars from the early 1900's to modern classics, and everything in-between, plus an amazing bunch of extreme hard core Classic Motorcycle guys, probably unique to the UK's North East.


Don't know about Jeremy, but this is just one of a whole lot of TYMC members I woudn't mind having dinner with.  Bill Taylor bought this fantastic 1935 Type 40  Racing Spec Norton International when he was a teenager.  Circa fifty years later he still push starts it (no kick start) before embarking on a 100 mile blast.  The open exhaust 'blat' will have certainly curtailed a few Sunday morning sleep-ins.

Next Post - Mid September